Reverse Engineering a Kodak Photo Printer: Building a Better App
I have had a Kodak Photo Printer Mini for a while. It’s a portable printer that connects to a smartphone and prints out card-sized photos. I enjoy using it because having physical copies of photos feels different from seeing them through a screen.
However, its companion app is riddled with bugs and is becoming harder to use with each iOS update. These are some of my complaints about the app:
- The printer needs to be connected manually: The printer uses wifi to connect to a smartphone. Every time I need to print photos, I have to go to the settings of my phone and connect to the printer manually. Furthermore, because the access point the printer creates is not connected to the internet, iOS disconnects from it after a while.
- Not compatible with iOS’s storage optimization: iOS only keeps thumbnails on the phone and stores original photos on iCloud when the photo storage optimization feature is on. The images don’t appear in the printer app if the original file is not on the device.
- Print preview in the app is broken: The app shows a preview of the photo selected, but the framing is slightly different from the actual print. Even worse, after cropping an image, the other side of what’s shown on the screen will be printed.
I could purchase another, but I really didn’t want to since the printer itself works perfectly fine. Its 4PASS technology produces much higher quality results compared to other portable photo printers. Unfortunately, it seems that all the printers using 4PASS technology are manufactured by a single company, Prinics. Their companion apps are just rebranded versions of my printer’s app and are registered on the App Store under the same developer, Prinics. I don’t trust those apps either.
So, I decided to make my own companion app.
Analyzing the communication
Tapping into the comm
The first thing I needed to understand was how the printer and the companion app communicate. I knew they use WiFi, which meant I could capture and analyze the packets. But how exactly could I do that? It turned out that I could set up a Remote Virtual Interface (RVI). By configuring this interface, I could monitor all network traffic from an iOS device on my Mac. I connected my phone to my Mac and set up the RVI. A new interface appeared on my Mac, allowing me to start recording the communication.
$ rvictl -s <UUID>I ran rvictl to set up an RVI and chose rvi0 interface which was created by
rvictl. Then, I printed a photo while capturing the packets. The IP address of
192.168.42.1 was assigned to the printer so I was able to filter the packets
that were sent to or from the printer.
I observed two types of communication occurring. The first type was UDP broadcasts from the app and the printer’s responses. This appears to function both as a discovery mechanism and a way to query the printer’s status. The app periodically emits these broadcasts, and the printer’s response includes its name along with a value that changes based on the battery level. However, since UDP broadcasting on iOS requires Apple’s permission, I didn’t bother investigating it further.
The second type was the actual printing part. When I tapped the print button, the app established a TCP connection. The app sends large chunks of data right after it’s connected to the printer, then the printer starts printing. I assumed this was the actual photo being sent to the printer. After the printer had begun printing, the app periodically sent a small amount of data and the printer replied to them. It seemed like the app was querying the print status.
Image transfer
This is what the first part of the TCP stream looked like:
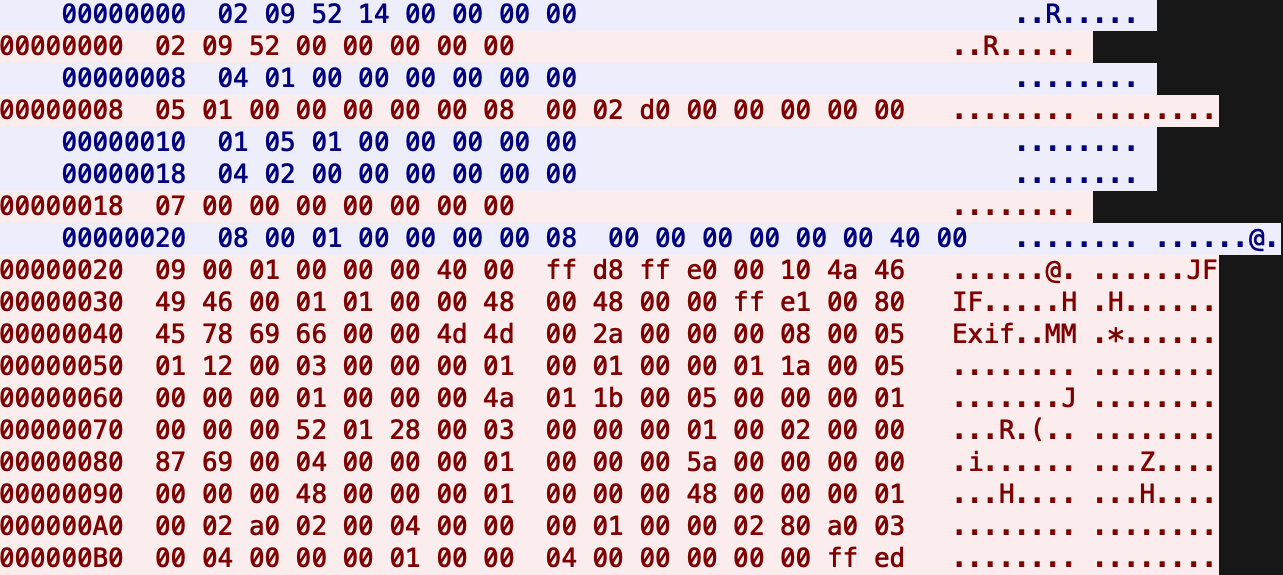
I wasn’t sure what these messages meant but the JFIF ASCII sequence caught my
eye. It was clear that the image was sent in JPEG format. A JFIF file begins
with a start of image (SOI) marker FF D8 and ends with a end of image
(EOI) marker FF D9. I copied the bytes from the SOI and the EOI to a file and
this is what I got:
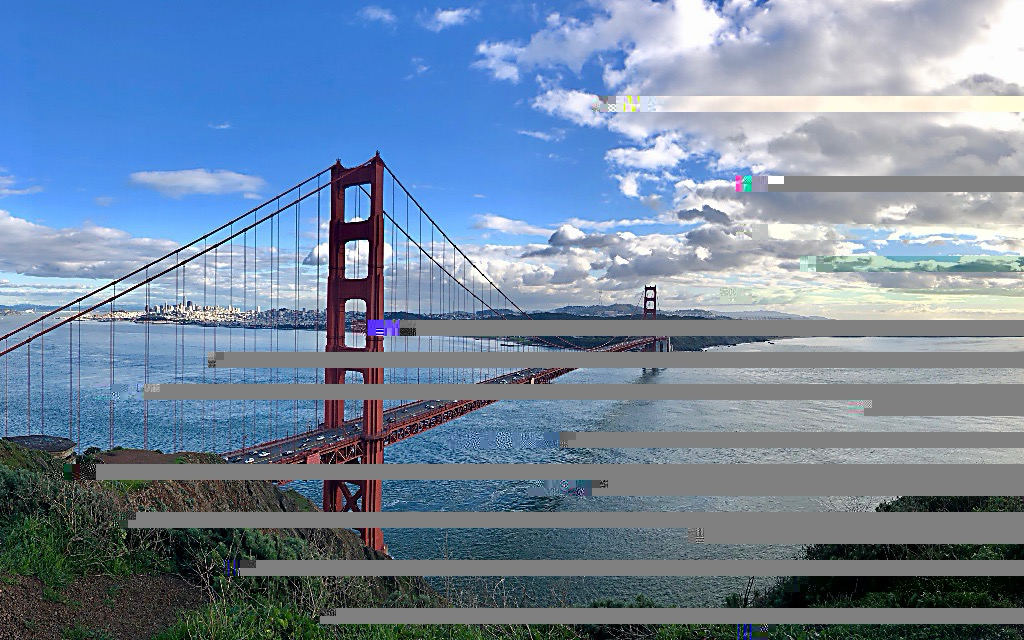
The image file appeared corrupted but the print came out fine. Clearly something else was going on. Upon closer inspection, I discovered that the printer was sending extra messages during the image transfer. Separating these packets and seeing them side by side revealed a pattern.
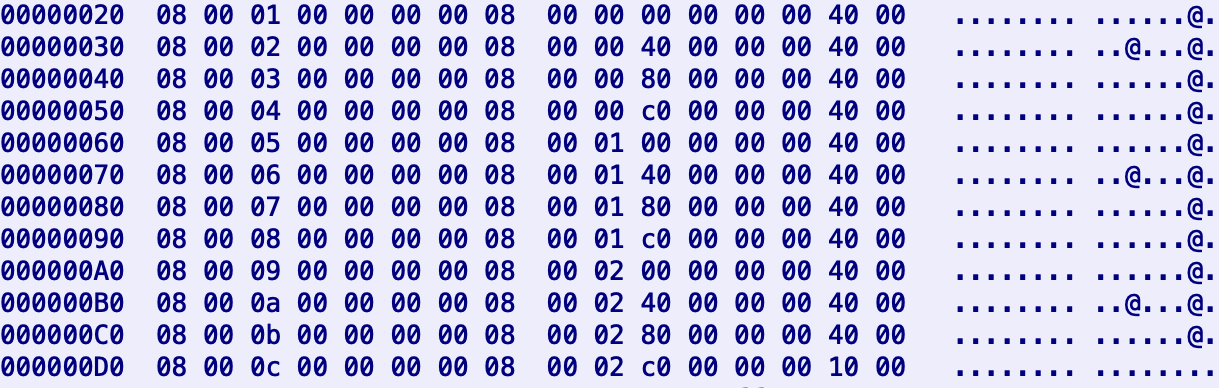
It seemed like the printer was requesting image data in chunks of 16KB(0x4000
bytes). I confirmed this by checking that the size of the responses to each
request was the requested data length plus 8 bytes for the message header. When
I copied bytes from the stream excluding the printer’s requests and the header
bytes in the responses, the result was a JPEG image without any glitches.
Based on the observations, I could label each byte of the image data request and response:
Request
| 0 | 1 | 2 | 3 | 4 | 5 | 6 | 7 | 8 | 9 | 10 | 11 | 12 | 13 | 14 | 15 |
|---|---|---|---|---|---|---|---|---|---|---|---|---|---|---|---|
08 |
00 |
Chunk No. | 00 |
00 |
00 |
00 |
08 |
Received Bytes | Chunk Size | ||||||
Response
| 0 | 1 | 2 | 3 | 4 | 5 | 6 | 7 | 8 | ... |
|---|---|---|---|---|---|---|---|---|---|
09 |
00 |
Chunk No. | 00 |
00 |
00 |
Chunk Size | Image Data Chunk | ||
Status updates
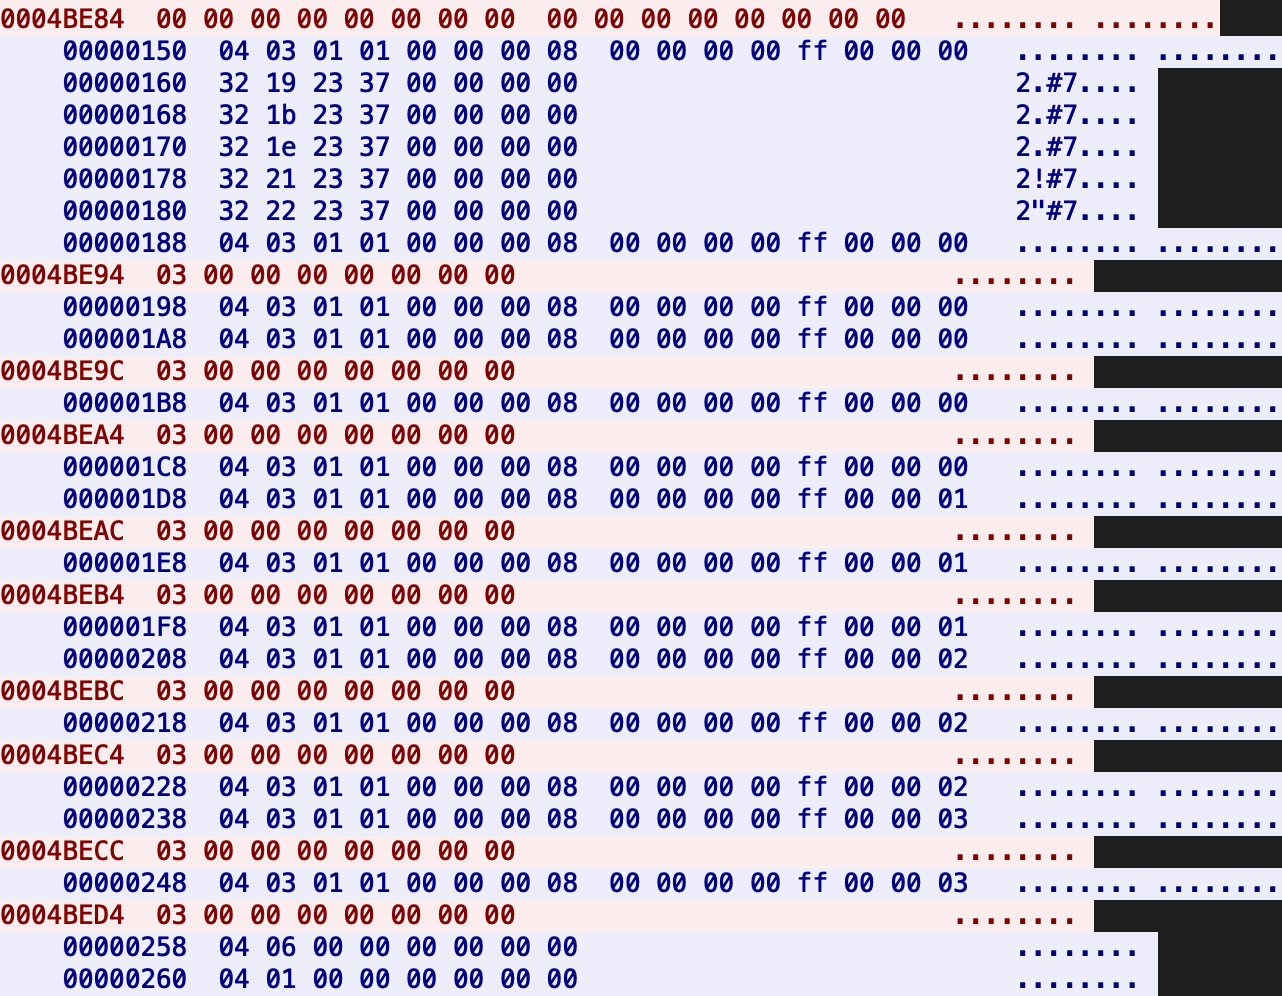
Once the photo was sent and the printing process began, additional data was exchanged periodically between the app and the printer. Since the app provides progress updates during the printing, I assumed this was part of that update. Only the last byte of the printer’s transmission changed, correlating with each step of the 4PASS process: yellow, magenta, cyan, and lamination. The printer transmitted the printing status whenever it advanced to the next step or when the app requested an update.
Request
| 0 | 1 | 2 | 3 | 4 | 5 | 6 | 7 |
|---|---|---|---|---|---|---|---|
03 |
00 |
00 |
00 |
00 |
00 |
00 |
00 |
Response
| 0 | 1 | 2 | 3 | 4 | 5 | 6 | 7 | 8 | 9 | 10 | 11 | 12 | 13 | 14 | 15 |
|---|---|---|---|---|---|---|---|---|---|---|---|---|---|---|---|
04 |
03 |
01 |
01 |
00 |
00 |
00 |
08 |
00 |
00 |
00 |
00 |
FF |
00 |
00 |
00: Yellow01: Magenta02: Cyan03: Lamination |
Failing cases
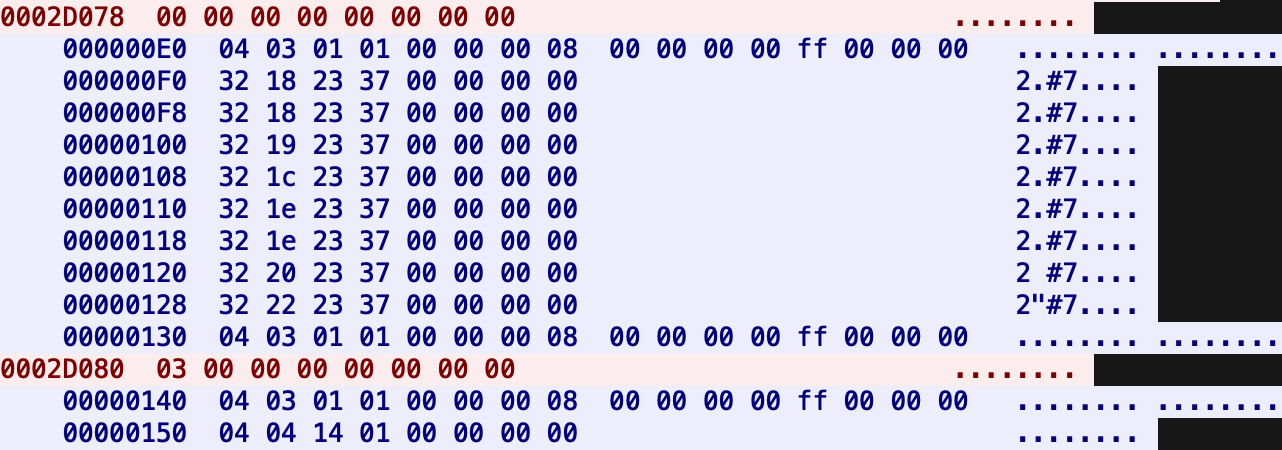
When the cartridge is empty or the battery level is critically low, the printer
reports a print failure. While I was collecting the packets, I attempted to
print photos under these conditions. I noticed that the printer’s responses to
the status query began with 04 04 instead of 04 03 followed by presumably a
2-byte error code. I could use this response to differentiate what caused the
print failure.
| 0 | 1 | 2 | 3 | 4 | 5 | 6 | 7 |
|---|---|---|---|---|---|---|---|
04 |
04 |
14 01: No Cartridge09 00: Low Battery |
00 |
00 |
00 |
00 |
|
Building the new app
There were still some messages that I didn’t know the meanings of, but I felt I had learned enough to print photos. In fact, those messages didn’t change across multiple network captures, and since they didn’t require any response back from the app, I could safely ignore them.
I started this project because I wanted a better app for my printer so there were specific criteria I wanted to meet.
- I should be able to select any photo from my library no matter whether it’s currently cached on-device or not.
- The printed result should match exactly what I see in the preview.
- I shouldn’t need to leave the app to connect to the printer.
Photo picker
The original app implemented its own photo picker screen, but it was never updated after the introduction of the iOS photo app’s storage optimization. As a result, photos that are not cached locally do not appear in the picker at all. Instead, I decided to use the system’s default photo picker. This way, I wouldn’t need to worry about managing permissions or keeping up with new features being added in the future. The system picker will automatically provide all the new features without requiring any updates to the app.
Using the system photo picker is straightforward: simply present the picker, and a delegate method will be called when the user selects a photo.
// Present system photo picker.
@IBAction func showPhotoPicker() {
    var pickerConfig = PHPickerConfiguration(photoLibrary: .shared())
    pickerConfig.filter = .images

    let picker = PHPickerViewController(configuration: pickerConfig)
    picker.delegate = self
    present(picker, animated: true)
}

// Called when user selects a photo.
func picker(_ picker: PHPickerViewController, didFinishPicking results: [PHPickerResult]) {
    guard let result = results.first else {
        picker.dismiss(animated: true)
        return
    }
    let itemProvider = result.itemProvider
    guard itemProvider.canLoadObject(ofClass: UIImage.self) else { return }
    imageFetchProgress = itemProvider.loadObject(ofClass: UIImage.self) { [weak self] image, error in
        guard let image = image as? UIImage else { return }
        DispatchQueue.main.async {
            self?.changePhoto(image)
        }
    }

    picker.dismiss(animated: true)
}
Preview & editing
I remember feeling frustrated multiple times because the print result didn’t match what I saw in the preview. The editing interface of the original app is too cluttered, and the cropping feature stopped working as intended after several iOS updates. I didn’t need fancy editing tools; I just wanted to be able to crop and rotate images. Additionally, I wanted the preview to reflect exactly what I would get after printing.
I placed a view that will act as the preview and ensured its aspect ratio
matches that of the paper used by the printer. Next, I added an image view as a
subview within this view and attached gesture recognizers to the image view to
manipulate its position, scale, and rotation. Finally, I rendered the entire
preview into UIImage using UIGraphicsImageRenderer.
extension UIView {
    func asImage() -> UIImage {
        let renderer = UIGraphicsImageRenderer(bounds: bounds)
        return renderer.image { rendererContext in
            layer.render(in: rendererContext.cgContext)
        }
    }
}
Printing
One of the problems I faced while using the printer was having to switch WiFi
every time I wanted to print. However, since the printer’s WiFi is not connected
to the internet, iOS automatically disconnects from it after a certain amount of
time. This becomes particularly frustrating especially when I’m trying to print
multiple photos. Fortunately, NetworkExtension exposes API for apps to
temporarily join a WiFi network. I utilized this API to automatically connect to
the printer.
func joinPrinterNetwork() async throws {
    let config = NEHotspotConfiguration(ssidPrefix: ssidPrefix, passphrase: password, isWEP: false)
    config.joinOnce = true
    try await hotspotConfigManager.apply(config)
}
The joinOnce property is set to true, ensuring that the connection is only
active while the app is running in the foreground. When the app goes into the
background, iOS automatically reconnects to the WiFi network it was previously
connected to, eliminating the need to switch WiFi manually in the settings.
Next, the app establishes a TCP connection with the printer, waits for messages from it, and responds to them accordingly. The complete logic can be found here.
Result
Time to test my new app! I loaded a photo from my library and hit print. The app automatically connected to the printer and began sending image chunks as the printer requested. It also updated the status as the printer progressed through each colour. The final result looked exactly like the preview I had seen.
There’s still room for improvement, though. The app could feature a more attractive user interface and it could include advanced photo editing options like those found in typical photo printer apps. Additionally, it could take advantage of more iOS features, such as the share sheet extension allowing users to print photos directly from the share sheet instead of first saving them to the library and loading them into the app. However, these enhancements aren’t essential for me right now, so I’m happy with how the app has turned out.